Prompt Guidance
Anime Profile Picture: Seven Briefs and One Crop Check
A profile picture is displayed as a circle, so the corners are gone and the face is smaller than it looked in the editor. This box is the brief that keeps a photo recognisable: it names the features that must not change, then means the head to about 60% of a square frame.
Optional
JPG / PNG / WebP
This is Ottermind's composer. Filling the brief and sending are separate actions, and no image is generated until you continue in Studio.
November 14, 2026 · 12 min read
An anime profile picture is one square image that the platform will cut into a circle. That single fact decides most of the work. The four corners you composed for are removed, the face ends up smaller than it looked in the editor, and anything near the edge is simply gone. Making an anime picture is easy. Making one that still reads as a face at 96 pixels is where most attempts fail.
Three things usually block people, and none of them is the generator. You cannot say which of the hundred "anime" looks you want, so every attempt comes back as a different artist's default. You have a photo of yourself and no idea which features have to survive the conversion. Or you are about to use artwork from a gallery page and cannot say what you are allowed to do with it. This guide takes those three in order: choose the route, write a brief that names what must not change, then check the result at the size other people will actually see it.
How this guide was prepared: The search results for "anime profile picture" were read in a US-English desktop browser on November 14, 2026, along with the pages that rank for it: Dreamina's resource page, Phot.AI's Anime PFP Maker, and the gallery and stock sites listed below. Ottermind's own Photo to Anime Converter and Avatar Maker pages were checked against the local marketing checkout at origin/main (0c719e88) on the same date, including their published limits. The character artwork in this article was generated for it on November 14, 2026 with GPT Image 2.5 Sunburst from the prompts printed below, and the crop diagram is assembled from that artwork rather than generated separately. The composer figure is a real screenshot of this page. No generation was submitted to Ottermind for this article, so nothing here is presented as a promised result, and no pricing, credit amount, generation time or output format is claimed.
What the pages already ranking answer
Results for this phrase split into three different jobs, which is why a phrase this common also scores as easy to enter.
| The job | Who is ranking for it | What they give you |
|---|---|---|
| Find a ready-made one | pfps.gg, Alpha Coders, Wallpapers.com, Pinterest boards, Adobe Stock and Shutterstock | A picture, sorted by mood, character or "cute" |
| Make one | Phot.AI, Fotor, AnimePFP, Craiyon, Dreamina's resource page | A generator with a style menu |
| Read ideas first | Reface's ideas guide | Categories and examples to react to |
The makers are all variations of the same four steps. Phot.AI, checked November 14, 2026, describes them as upload or describe, choose a style from five named directions, generate, then download and set it as a PFP. Dreamina's page title promises three methods — generation, photo styling, and a character builder — and its description frames the page as three easy ways to get an anime profile picture.
None of that is wrong. It is just aimed at the moment before the result exists. Two decisions decide whether the picture works once it is on a profile, and the maker pages do not cover either: what the circular crop does to the composition, and what you can honestly claim about the image afterwards. This page is written for those two, with briefs you can paste into any of the tools above, including ours.
Three routes to one image
Pick the route before the style, because each one has a different failure mode.
| Route | What you need | What you get | Where it breaks |
|---|---|---|---|
| Download from a gallery | Nothing | A finished picture in under a minute | You usually cannot show what you are allowed to do with it; the same image is on thousands of other profiles; nothing about it is yours |
| Convert a photo of yourself | One sharp photo, permission from anyone else in it, and a list of features that must stay | A recognisable stylised version of a person you can point to | Identity drifts; the model makes choices you did not ask for; a soft or crowded source makes every attempt worse |
| Generate from a written brief | A description: hair, eyes, palette, line, framing | Full control of the look, and no source to preserve | You have to describe everything, and two images will only match if you keep the brief |
If the answer has to look like a specific person, only the second route can be checked against something. If the answer is a look — a cyberpunk portrait, a retro cel frame, a matching pair for two accounts — the third route gives you more control than a photo conversion, because there is no likeness to lose.
The crop decides more than the style
A circular avatar keeps the largest circle that fits inside your square. That is 78.5% of the image area. The other 21.5% — all four corners — is discarded before anyone sees it. Inside the circle, a square rotated 45° and touching the edge is the largest area guaranteed to survive: its side is 70.7% of the image width, so anything you place within the central 70% square is always visible.
That is the whole geometry, and it produces one practical rule: compose for the circle, not for the square. A wide shot with the head in the upper third is a good photograph and a bad avatar, because the crop keeps the middle and throws away the top of the head.
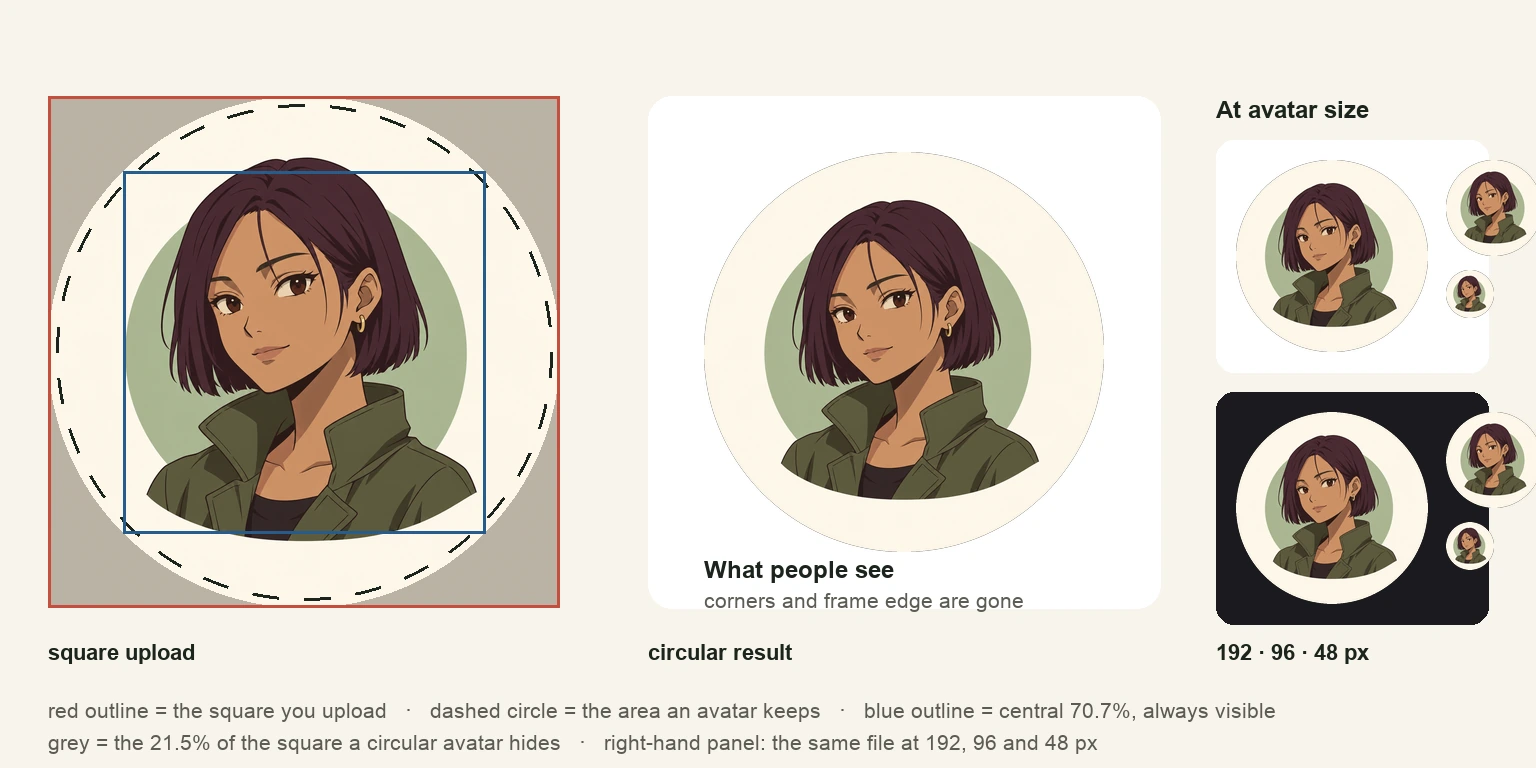
One square file, three readings. Left: the square you upload, with the dashed circle an avatar keeps and the blue square that is always visible. Middle: the same file as it is displayed. Right: the same file at 192, 96 and 48 pixels on a light and a dark surface. Artwork generated for this article; the overlays and the size strip were assembled from it, not generated.
Five numbers are worth holding to while you write the brief:
- Head fill. From the top of the hair to the chin should be roughly 55–65% of the square's height. Below 45% the face becomes a detail; above 75% the hair starts to touch the circle's edge.
- Top margin. Leave 8–12% of the height empty above the hair. A flattened fringe against the edge reads as a mistake at small size.
- Eye position. Put the eyes just above the vertical centre of the head, and keep both eyes inside the central 70% square.
- Edge contrast. Ask for a flat background of one or two colours. Gradients and busy backgrounds give the circle a fuzzy edge that reads as a badly cut sticker.
- Line weight. At 1024 pixels, a line around 15–20 pixels wide survives being scaled to 96. Hairline detail and individual eyelashes do not; at avatar size they turn into grey noise. One focal detail — an earring, a scar, a single highlight — is what remains visible.
Seven briefs, and what each one controls
The blocks below are complete, copy-ready briefs, not sketches. Each one is followed by the single thing it is responsible for. The two Ottermind pages this article connects to expose a prompt box and, on the converter, one optional photo — there is no style dropdown, so the style has to be in the words.
1. The likeness lock
Use this one when the picture has to be you. It separates what must not change from what is allowed to change, which is the only way to judge a conversion afterwards.
Convert the attached portrait into an anime illustration. Keep exactly: the face shape and jawline, the hairline and where the hair ends, the eye shape and eyelid fold, the eyebrow angle, the nose length, the mouth width, the earring, and the skin tone. Change only the rendering: replace photographic detail with one clean outline of even weight, two flat skin values plus one shadow tone, flat hair masses with three or four ink strands, no stray strands, no gradients, no glossy highlights, no painted texture. Keep the same head angle, the same expression and the same collar. Replace the background with one flat colour taken from the clothing. Square frame, head from hair to chin about 60 percent of the frame height, even empty margin on all four sides, nothing touching the edges. No text, no logo, no watermark.Controls: which features carry identity, and which freedoms you grant. If the result is wrong, this is the block to edit — not the style.
2. The cel brief
The cleanest starting point for something that has to read small: one outline, flat fills, no gloss. The artwork in the crop figure above was generated from this brief.
Anime-style illustration of an original character: a young woman with a blunt chin-length dark plum bob, one thin strand across her forehead, warm tan skin, a small gold hoop earring, an olive green jacket with a raised collar. She faces slightly left, head and shoulders, calm faint smile, eyes open toward the viewer. Centered square composition, the head occupies about half the frame height, even empty margin on every side, plain cream background with one flat sage-green circle behind the shoulders. Contemporary anime cel: one confident dark-brown outline of even weight, flat fills with two skin tones and a single shadow tone, no gradients, no glossy highlights, no painterly texture, no 3D render look. No text, no logo, no watermark, no border.Controls: the rendering system — line, number of tones, and the refusal list. Keep this block identical between attempts and change something else.
3. The retro cel variant
The same character and framing as block 2, with only the style sentence replaced. Paste this whole block; nothing needs filling in.
Anime-style illustration of an original character: a young woman with a blunt chin-length dark plum bob, one thin strand across her forehead, warm tan skin, a small gold hoop earring, an olive green jacket with a raised collar. She faces slightly left, head and shoulders, calm faint smile, eyes open toward the viewer. Centered square composition, the head occupies about half the frame height, even empty margin on every side, plain cream background with one flat sage-green circle behind the shoulders. 1990s retro TV anime cel: thinner tapered line, slightly dusty muted palette, one warm blush on each cheek, subtle film grain, softer eyes, no gradients on the skin, no glossy highlights, no modern digital glow. No text, no logo, no watermark, no border.Controls: period texture and palette. This is the middle panel of the comparison below.
4. The key-animation variant
A third rendering system — ink line plus painted values instead of flat fills — again with the character and framing untouched.
Anime-style illustration of an original character: a young woman with a blunt chin-length dark plum bob, one thin strand across her forehead, warm tan skin, a small gold hoop earring, an olive green jacket with a raised collar. She faces slightly left, head and shoulders, calm faint smile, eyes open toward the viewer. Centered square composition, the head occupies about half the frame height, even empty margin on every side, plain cream background with one flat sage-green circle behind the shoulders. Modern key-animation look: crisp variable-width ink line with a few confident strokes, three soft painting values for shading, cool rim light from the upper right, hair rendered as distinct ink strands, no gradients across large flat areas, no glossy 3D look. No text, no logo, no watermark, no border.Controls: line variation and shading model. This version survives printing and large header use better than flat cel, and it loses the most detail when shrunk to avatar size.
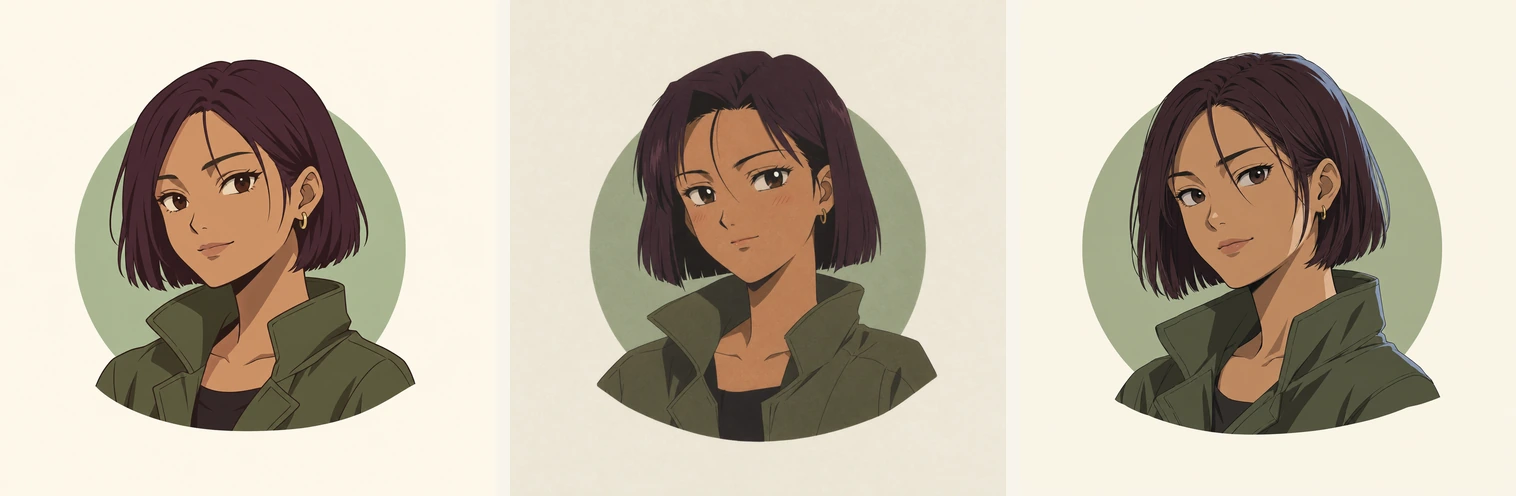
One written character, three rendering systems. Left: the cel brief in block 2. Middle: block 3, the retro variant. Right: block 4, the key-animation variant. Each was generated from the same character and framing paragraphs with only the style sentence changed, which is why the pose and palette hold while the line and shading move. Generated for this article; not a product screenshot.
5. The circle-safe framing pass
Run this when a result you like fails the circle test. It changes framing only, so you keep the character.
Recompose the same character as a square avatar. Head from the top of the hair to the chin is 60 percent of the frame height, and the top of the hair sits 10 percent below the top edge. Centre the face on the vertical axis with the eyes just above the head's midpoint. Shoulders enter at the bottom corners only, no hands, no props, no arm crossing the frame. Background: one flat colour behind the shoulders and a second flat colour for the rest, with a single clean edge between them. Nothing important within 15 percent of any edge. Keep the existing line style, palette and hair shape unchanged. No text, no logo, no watermark.Controls: head fill, margins and background complexity — the three variables that decide whether a good picture is a good avatar.
6. The small-size expression pass
Faces lose their expression long before they lose their shape. This block changes only the features that read at 96 pixels.
Same character, same framing, same style. Change the expression only: eyebrows raised slightly at the inner end, eyes fully open with a clear white area on both sides of each iris, a small highlight in the upper-left of each iris, mouth closed with the corners level rather than downturned. Keep the head angle, hair, palette and background identical. Simplify the eyelashes to three short strokes per eye and remove any fine line work inside the iris. No text, no logo.Controls: brows, eye aperture and mouth line — the three features that carry mood at small size — plus the detail budget inside the eye.
7. The matching pair
Two accounts, one look. The trick is not a better prompt; it is keeping the style and framing paragraphs identical and changing only who is in the frame.
Anime-style illustration of a second original character, built to match an existing portrait. Same style: contemporary anime cel, one confident dark-brown outline of even weight, flat fills with two skin tones and a single shadow tone, no gradients, no glossy highlights, no painterly texture. Same framing: centred square composition, head from hair to chin about 60 percent of the frame height, the top of the hair 10 percent below the top edge, eyes just above the head's midpoint, even empty margin on every side, plain cream background with one flat sage-green circle behind the shoulders, nothing important within 15 percent of any edge. The character: a young man with a short dark undercut, square glasses and a charcoal turtleneck, facing slightly right, calm expression, one visible earring. No text, no logo, no watermark, no border.Controls: consistency between two separate generations. If the pair does not match, the cause is almost always a style paragraph that was rewritten instead of copied.
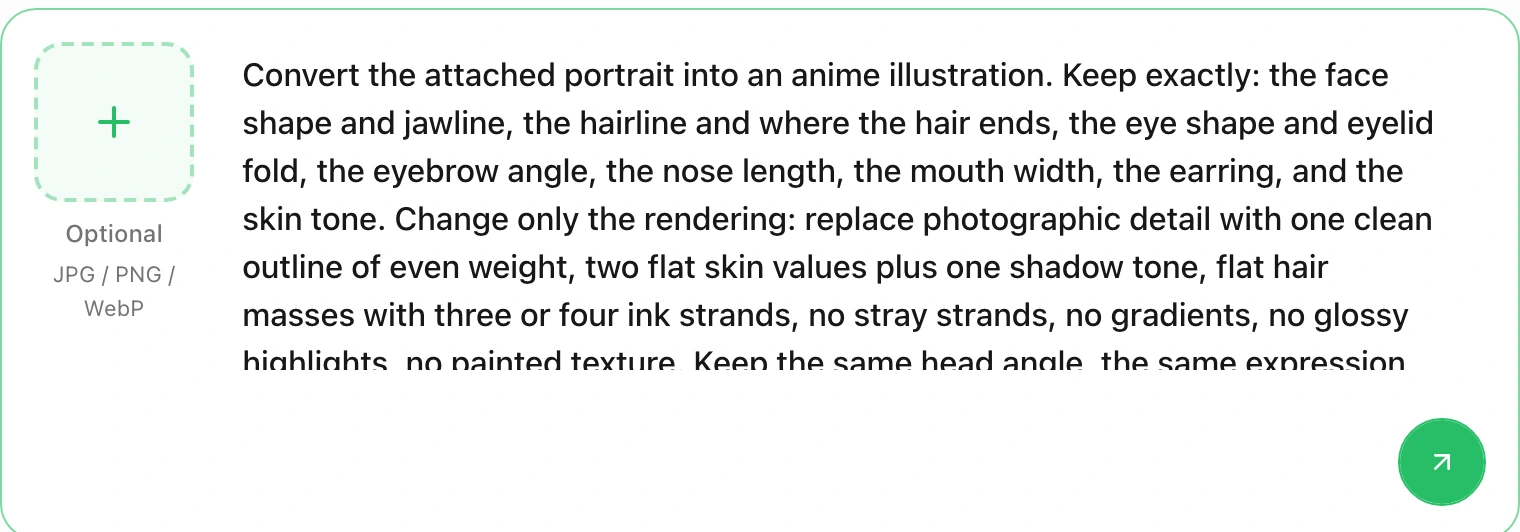
The likeness brief in this page's own composer after the button above was pressed. The field grows with the text until it reaches its limit and then scrolls, which is why the last visible line is cut; the optional attachment sits on the left, and filling is not sending. Screenshot of this page taken November 14, 2026 — request preparation, not a generated result.
From a photo to a published avatar
- Open the platform's own upload screen first. Accepted formats, the crop it applies and where the image appears at what size differ between products, and the live upload screen is the only authority. Screenshots in older guides are frequently out of date.
- Choose the source photo for the conversion. One person, face broadly toward the camera, even light, nothing crossing the eyes or mouth, and enough room around the head. A cropped group photo or a heavy filter costs more likeness than any prompt can recover.
- Write the likeness lock, then generate three to five versions with the same brief. Five variations of one brief is a comparison. Five different briefs is a lottery, and you will not know which sentence caused the difference.
- Judge at full size, then at 96 pixels. Full size answers "is this the right person and style"; 96 pixels answers "does it read as a face in a comment thread". Both checks are needed, and they fail differently.
- Fix one variable per attempt. Eyes, then framing, then background. Two changes at once and you cannot reproduce the version you liked.
- Recompose rather than crop. If the head is too small in the circle, ask for a new composition with a larger head fill. Cropping a wide image to fix the circle throws away resolution and usually cuts the top of the hair.
- Set it, then look at it in place on both a light and a dark interface. A cream background that looked calm in the editor can vanish against a light theme.
- Keep the brief. Paste it into a note with the tool name and the date. That is the only reliable way to make the next one match.
What goes wrong, and the fix
| What you see | What caused it | The fix |
|---|---|---|
| The face is tiny inside the circle | The composition was made for a feed, not an avatar | Run the framing pass in block 5; do not crop |
| The hair merges into the background | Two similar values, or a gradient behind the head | Ask for one flat background colour that contrasts with the hair by value, not by hue |
| The eyes look empty at small size | No iris detail, or far too much of it | Use block 6: clear iris, one highlight, three lash strokes |
| It looks like a generic AI anime face | Nothing distinguishing was named | Add one specific feature — a scar, a gap tooth, an earring, an asymmetric fringe — and name the palette |
| It looks like a specific existing character | A franchise, studio or artist name in the prompt, or a model default | Describe features instead of naming a property; never ask for a licensed character |
| Version two looks nothing like version one | Several sentences changed at once | Freeze the style and framing paragraphs and edit one clause |
| Skin looks like plastic | "Highly detailed", "8K", "photorealistic skin" in an anime brief | Ask for two flat values plus one shadow tone and no glossy highlights |
| The outline disappears when small | Line weight below roughly 1.5% of the image's short edge | Raise the line weight in words; check at 96 pixels |
| You cannot reproduce the result | The brief was never saved | Keep the block, the tool and the date with the file |
Rights, likeness, and the two claims to avoid
This is the part of the topic that the maker pages leave out, and it matters more than any style tip.
Gallery downloads are not automatically free to use. A download button is not a licence. Wallpaper and PFP galleries mix original art, fan art and reposts, and many of them do not hold the rights they are distributing. If the account is a personal one, the practical exposure is small; if the avatar sits next to a business, a product or a paid promotion, the same image becomes a commercial asset with an unclear chain of title. Read the site's terms and, when the answer is unclear, treat the image as reference rather than stock.
A picture of a known character is a derivative work. Making one for your own profile is common and rarely pursued; that is not the same as being licensed, and it does not become licensed because a generator produced it. If you need an anime-looking avatar you can use commercially, ask for an original character — as the briefs above do — or use art you commissioned and have a written agreement for.
Your own photo needs the other person's permission too. If you convert a photo that includes someone else, or convert someone else's photo as a gift, you need their agreement, not just their Instagram post.
Two claims to avoid. The first is ownership: tool terms differ on what rights you receive in the output, and none of them can promise that a similar image does not already exist. Check the current terms of whichever tool you use; this page draws no legal conclusion. The second is likeness: a stylised version of a face is an interpretation, not a guarantee. Ottermind's own Photo to Anime Converter page says so directly — the result may remain recognisable, but exact identity preservation is not promised, because anime stylisation changes proportions, line work and shading by design.
One more boundary is worth stating plainly. No generator can settle whether a specific anime look is "correct", whether a style that resembles a studio's work is acceptable to that studio, or whether a platform will treat your avatar as impersonation. Those are judgement calls about people and platforms, not about prompts.
Where this runs in Ottermind
Both of Ottermind's entries for this task are prompt-and-reference tools, and they answer different halves of the job.
- Photo to Anime Converter takes a photo and a written direction — line weight, shading, palette, mood, setting — and returns a stylised interpretation you can compare against the source and refine. It is the route to use when the avatar has to resemble a real person. Its own page is explicit that recognisability is likely but not guaranteed.
- Avatar Maker from Photo is built around the decision this article spends most of its length on: name the destination, choose the style and crop, then check the result at profile size inside a small circular crop before you commit to it.
Neither page promises a fixed number of attempts, a fixed generation time or a particular output resolution; those depend on your account and the current product surface, so check them where you generate. The landing-to-Studio workflow accepts PNG, JPEG or WebP references, and hands your prompt and attachment to Ottermind Studio, where the revision conversation happens — the marketing page itself does not generate anything.
If you already know the look you want and only need the framing fixed, the framing pass above is the shortest path: paste block 5 into either tool with your existing image as the reference.
Related reading
- Chibi Style: Proportions, Prompts, and How to Check a Result — if the avatar should be small-bodied and round rather than a portrait, the head-count rules there replace the crop rules here.
- AI Christmas Photo — the same photo-conversion discipline applied to a seasonal portrait, including how to keep a face recognisable through a heavy restyle.
- White Background — for a clean, single-colour backdrop behind the head, which is the fastest way to fix a fuzzy circle edge.
- Poster Ideas — if the avatar is one piece of a set, the six-slot brief there is the place to plan the others.