Prompt Guidance
Morphing: How to Build an A-to-B Transform That Holds Together
Morphing is one subject becoming another inside a single continuous shot. Start from one frame, describe the path the change takes, and check the frames that decide whether a viewer reads it as a transformation or as a mistake.
Optional
JPG / PNG / WebP
This is Ottermind's composer. Attach the start frame, then send the brief — filling the text and sending are separate actions, and nothing is generated until you continue in Studio.
November 12, 2026 · 12 min read
Morphing is one subject becoming another inside a single continuous shot. The mug's handle folds into a wing, the glaze turns into folded paper, the shadow stays where it was, and the camera never blinks. It is not a fade between two pictures: the picture stays one picture while the thing inside it changes.
That single condition decides when to use it. A morph earns its frames when the change itself is the message — a material becoming another material, a product becoming its packaging, a face ageing, a demo where the "before" turns into the "after" without a cut. It is the wrong tool when the two states are unrelated, when the reader needs to compare them side by side, or when the two images were shot in different light: then you want a cut, a split screen, or a dissolve, because a morph will invent the missing middle and the invention is where it breaks.
How this guide was prepared: Official pages were checked on November 12, 2026: Dreamina's morphing animation resource page (published October 24, 2026), which documents a first-frame plus last-frame workflow, a duration setting and five example categories; and Ottermind's own Image to Video and Image Effects pages, whose steps are choose a reference image, describe the motion, then review and rerender. Frame counts here are frame-rate arithmetic, not measured render times. Every figure is accounted for: the strip is a computed interpolation between two silhouette drawings, the timeline and anchor figures are diagrams drawn to scale from the numbers in the text, the cover is set in type around the same sample frames, and the composer figure is a real screenshot of this page with the brief typed in. No generation was submitted inside Ottermind for this article, so nothing here is a guaranteed output, and no figure is a product render.
What counts as a morph, and what only looks like one
Two operations happen at once, and they are the only two levers you have. A warp moves the geometry: the parts of the start frame travel to the positions they hold in the end frame. A blend changes the surface: colour, texture, gloss and edge softness cross over. Get the warp right and the blend short, and the change reads as one object transforming. Get the blend wrong — too long, too early — and you get two objects overlapping, which is a dissolve wearing a morph's clothes.
The working test is a pause. Stop the clip in the middle. If you can count one object, it is a morph. If you can count two, even faintly, it is a cross-dissolve, and no amount of extra prompt length will hide that.
| What people call morphing | What it actually does | Why it is not a morph | Use instead |
|---|---|---|---|
| A cut or a wipe | Swaps A for B on one frame, or slides a boundary across | Nothing travels; the geometry never moves | A cut, when the two states are unrelated |
| A cross-dissolve | Fades A out while B fades in | Both objects are on screen at the same time | A dissolve, when the change is a scene change |
| A style transfer or filter | Keeps the geometry, changes the surface | Only half of a morph: the blend without the warp | An image effect, when the shape should stay |
| A speed ramp or a spin | The same object moving faster | Identity never changes | Camera or motion direction in the video prompt |
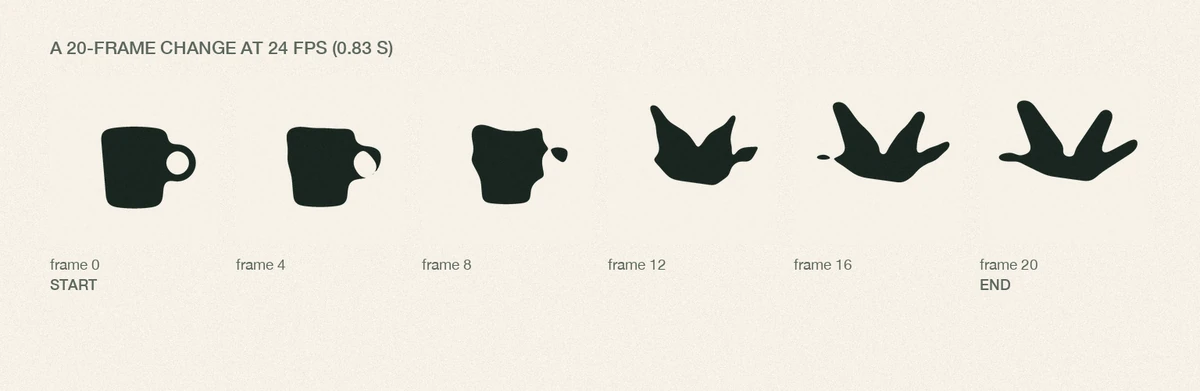
Twenty frames of change at 24 fps, sampled every fourth frame. The strip was computed for this article by interpolating the two silhouettes, and it shows the two operations a morph has to perform — geometry travels, then the surface follows. Frame 8 is the one to study: the handle has separated from the body and a viewer can count two objects. That is exactly the failure the numbers below are designed to prevent.
The five numbers that decide whether it reads
Most weak morphs are not a rendering problem. They are a timing and correspondence problem that was handed to a model to solve. Five numbers cover it, and each one is checkable on a pause.
| Number | What it fixes | Target | How to check it |
|---|---|---|---|
| Length of the change | How much time the warp gets | 12–17 frames at 24 fps (0.5–0.7 s); 24–36 frames (1–1.5 s) only when the change is the whole shot | Count the frames between the first and last changed frame |
| Hold at each end | Whether the eye registers A and B at all | 6 frames at 24 fps (0.25 s) minimum at both ends | Pause on frame 1 and on the last frame; both must be still and complete |
| Anchor pairs | How many features promise "this is the same thing" | 4–6 pairs, chosen before you prompt | Name them out loud: rim centre, handle root, shadow edge, cloth fold |
| Anchor offset | How far a fixed feature is allowed to drift | Under 8% of the frame width; scale within 10% | Put A and B side by side at the same size and measure the gap |
| Path changes | Whether the transformation has one direction | One path; at most one fold-back | Count direction reversals in the change |
The arithmetic is the part people skip. Frames are not seconds: 18 frames is 0.75 s at 24 fps and 0.6 s at 30 fps, and a clip that feels slow at one rate feels rushed at the other. Decide the frame count first, then set the rate, then write the timing into the prompt in the units the shot uses.
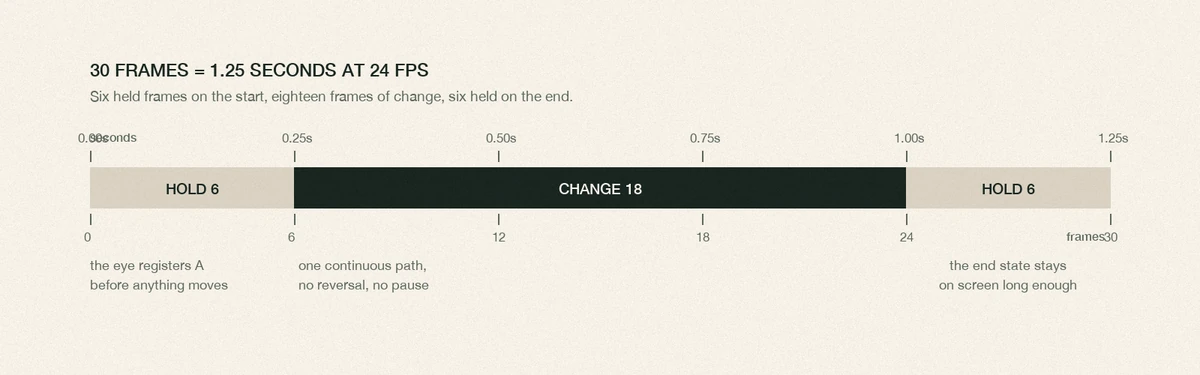
A 30-frame shot at 24 fps: six frames held on the start, eighteen frames of change, six held on the end. Drawn to scale from the numbers in this table; it is a diagram, not a render.
Two smaller numbers are worth inventing for your own shot, because they make review objective. Write down the height of the subject as a percentage of the frame, and the position of its base as a percentage from the bottom. If A and B disagree by more than a few points, the morph will look like a lift or a slide even when the warp is clean.
Five prompts, one variable each
Every prompt below changes exactly one thing, so a bad result tells you which line to fix. They use one running example — a stoneware mug on linen becoming an origami crane — because it has an obvious correspondence (handle to wing) and an obvious failure mode (ceramic gloss surviving into paper). Ottermind's composer takes one reference image and written direction, so the timing lives inside the prompt as held frames rather than in a duration control on the public page.
| Prompt | The variable it controls | What to look at afterwards |
|---|---|---|
| 1. Destination | What the end state must share with the start | First frame and last frame side by side at the same size |
| 2. Anchors | Which points are not allowed to move | The four or five features you named, frame by frame |
| 3. Route | The order in which parts change | The middle third, paused |
| 4. Timing | Where the change sits inside the clip | Frame counts at both ends |
| 5. Refusals | The failure list the model is told to avoid | Anything new that appeared in the frame |
Prompt 1 — Destination. Controls the match between the end state and the start: scale, position, light direction, and how much of the frame the subject is allowed to occupy. Run it when the warp itself is roughly right but the result drifts off the cloth.
Starting from the attached frame, turn the stoneware mug into an origami paper crane and hold the last frame. Keep the subject the same size and in the same place in the frame, keep the linen cloth, the table edge and the window light unchanged, and keep the camera completely still. The crane must stay on the same spot of cloth as the mug, at the same height, facing the same way. Nothing else in the frame moves or appears. No text, no logos, no extra objects.The button fills this first brief into the composer at the top of the page. It only fills: nothing is sent, and nothing is generated until you continue in Studio. That gap is worth keeping on a morph, because the start frame has to be attached and the wording corrected before a render is worth spending.
Prompt 2 — Anchors. Controls correspondence: the small number of features that must stay in the same place, which is what makes a viewer believe the crane is the mug and not a second object.
Keep five points fixed through the whole change: the centre of the mug's rim, the point where the handle meets the body, the front edge of the shadow, the cloth fold behind the mug, and the top edge of the table. The crane's neck rises from the rim centre, its folded wing comes out of the handle, and its tail stays inside the shadow's front edge. The camera does not move, the light does not change direction, and the cloth and table do not drift by even a few pixels.Prompt 3 — Route. Controls the middle third: which part moves first, which part moves last, and whether the object is allowed to shrink, spin or lift while it changes.
Change the object in one continuous direction: first the handle folds down and narrows into a wing, then the rim closes and the wall creases into flat paper panels, then the glaze turns matte and becomes folded paper last. Do not let the object shrink, float, spin or bounce while it changes. Keep the base of the object touching the cloth at every moment.Prompt 4 — Timing. Controls the holds, in frames, so the change lands where you planned it instead of starting on frame one.
Hold the first frame completely still for the first six frames. Then change the object steadily over the next eighteen frames, at an even pace with no pause and no acceleration. Hold the final crane completely still for the last six frames, with no drift and no flicker. The camera stays locked for the entire shot.Prompt 5 — Refusals. Controls the failure list: the specific things that are not allowed to happen, written as prohibitions rather than wishes.
Keep the shot clean: no camera push, pan, zoom or shake; no change to the background, cloth, table or lighting; no extra objects appearing; no ghost of the mug left over the crane; no warping of the cloth; no added lettering or symbols. If the change cannot finish, stop the object in a believable half-folded state rather than showing two objects at once.A sixth prompt is not a morph prompt at all; it fixes the seam between two clips by making the light agree first. It belongs on the Image Effects page rather than the video page, because it changes a still.
Match the colour, contrast and light direction of my uploaded photo to the reference framing: same warm window light from the left, same shadow direction and softness, same neutral linen colour, no colour cast. Keep the subject and the composition exactly as they are and replace only the light.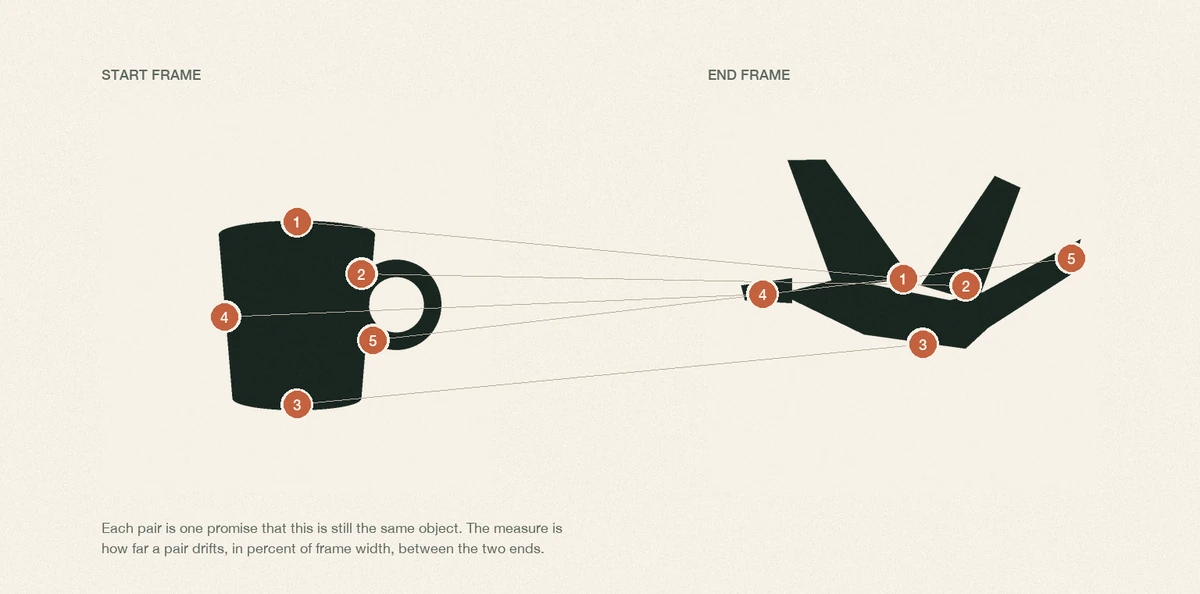
The five anchors marked on both ends, with the pairing drawn between them. This is a correspondence diagram, not a rendered morph: its job is to show which features are allowed to move and which are promises. Assign the pairs before you prompt, then measure the drift between the ends in percent of frame width.
Where AI morphs break
The failures below are specific to generated video, not to animation in general, and most of them are visible in a single paused frame. Check them in this order, because a ghost that survives every other fix is usually a timing problem, not a texture problem.
| What you see | What is usually happening | The fix |
|---|---|---|
| A faint double image through the middle | The blend starts before the warp finishes | Shorten the change and put the surface change last in the prompt |
| Soft, melted edges on a hard object | The model is averaging textures instead of moving geometry | Name the hard edge and the material in the prompt; keep the change under 0.7 s |
| The wall or cloth ripples even though the subject is still | The model treats the whole frame as morphable | Ask for the background, cloth and table to stay unchanged and the camera to stay locked |
| An extra flap, spike or limb | The model invents a plausible wing instead of folding the handle | Give the correspondence explicitly: which part becomes which, in order |
| Lettering turns into plausible gibberish | Text has no stable geometry to warp | Keep type out of the morph; add real lettering in an editor afterwards |
| The subject drifts toward camera | A push or zoom is being read as part of the change | Say "camera locked" and "no push, pan or zoom"; compare subject height in the first and last frame |
| A visible jump where two clips meet | The middle still and the second clip's first frame disagree | Grade both clips first, then cut on the shared frame or hide the seam in a short dissolve |
| Mushy detail on fast motion | Too much change in too few pixels | Slow the change, shorten it, or render larger and crop |
One failure deserves its own line because it is the most expensive: a morph that lands on a wrong endpoint looks like a bad clip, while a morph that lands on a wrong endpoint with perfect motion looks like a bad idea. Approve the two endpoints as stills before you spend a render on the transformation between them.
Morphing, tweening, and the dissolve in between
The three words get used for each other, and the difference is practical rather than academic: it tells you which control to reach for.
Tweening fills the frames between two poses of the same subject. A rig or a keyframe pair defines the poses, and the work is interpolation — the subject stays itself, and the question is timing and easing. Morphing changes the subject itself between two stills, so the work is correspondence — which part of A becomes which part of B, and where the surface changes. A morph has no rig to trust; that is why the anchor list matters more than the easing curve. If your clip keeps one subject and asks how it moves, you want the tweening workflow; if the subject changes identity, you want this page.
A cross-dissolve is the cheap version of both: A fades while B appears, with no geometry travelling. It is honest when the two shots are unrelated and dishonest when they are supposed to be the same object, because the audience reads a dissolve as a scene change. The pause test at the top of this page is the whole distinction.
Style transfer keeps the geometry and changes the surface, which is exactly half a morph. Ottermind's Image Effects is the right place for that half: it applies a visual direction to a permitted photo and protects the subject and framing. In a morph workflow it is the tool you use to make two endpoints agree in light before you animate between them — not the tool that moves anything.
One more adjacent variable is the camera. If the start frame is tilted and the end frame is level, the model will often rotate the world instead of the subject, which reads as a dutch angle being corrected rather than as a transformation. If you are deliberately using a tilted frame in either endpoint, read dutch angle first and keep the tilt identical at both ends, or accept that the tilt itself will become part of the morph.
Doing it in Ottermind
The boundary first. Ottermind's Image to Video page starts from one uploaded image and a written motion direction, and its own steps are: choose the reference, describe the motion, review the result and rerender. It is not a documented first-frame plus last-frame tool, so a true two-image morph is something you assemble around it rather than something you get from one field. Everything below respects that.
Path A — the subject changes inside one shot. This is the case the tool is built for, and the case the five prompts above describe.
- Prepare one start frame with the subject isolated enough that its silhouette is readable, and with the light you want at the end.
- Paste the destination prompt first, then the anchors, then the route. Keep the timing prompt for the second take rather than the first, so you learn what the model does with the shape before you constrain its clock.
- Generate, then pause three frames: the first, the middle, and the last. Reject on the middle frame, not on playback.
- Rerender changing one prompt at a time — route or refusals, never both — and keep the takes side by side until one holds at the pause.
Path B — two different stills, A and B. This needs a middle state, because the model has to be told what the object looks like halfway. Generate or find that middle still, then animate the two halves separately.
- Make B share A's framing: same camera height, same focal feel, same subject size within 10%, same light direction.
- Grade B to A with Image Effects before any animation, so the seam is a lighting problem you already solved.
- Produce the middle still — a half-folded object generated from A with the route described in words — and treat it as the hinge of the whole sequence.
- Animate A to the middle, then the middle to B, as two clips. Cut on the shared frame if the halves match, or overlap them by two to four frames if they do not.
- Review the join at normal size and again at thumbnail size, where a seam hides and a jump does not.
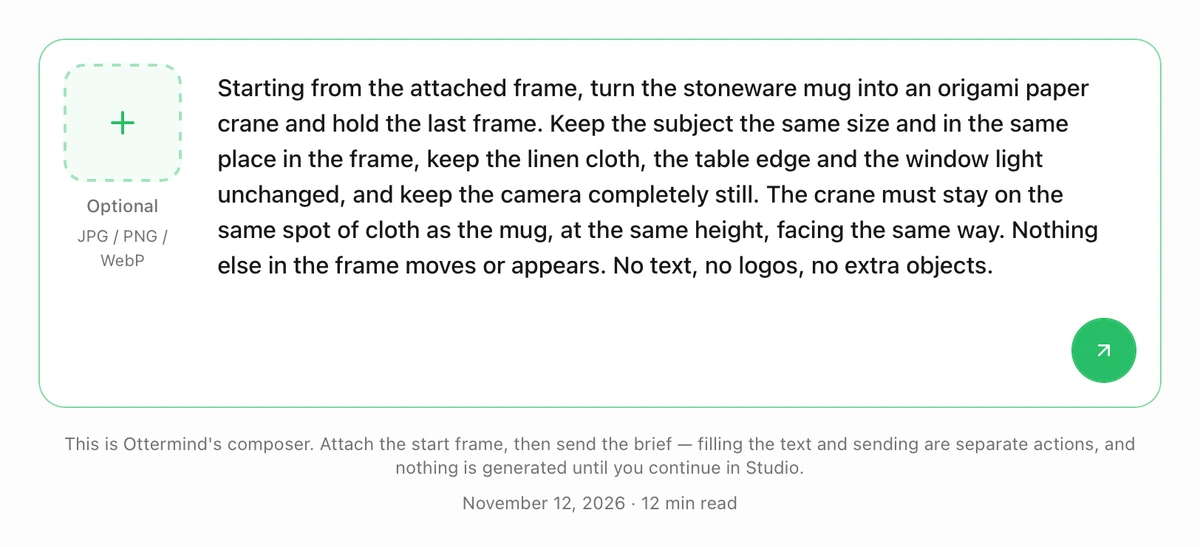
The composer on this page after the first brief was filled in. The attachment control is where the start frame goes, and the send control only hands the brief to Studio; this screenshot shows a prepared request, not a generated morph.
What stays outside the tool. Frame-exact endpoint control, a guaranteed duration, a fixed output resolution, and legible lettering are not things this workflow promises. Those live in your edit: trim the holds, place real type, and cut the two halves to the frame you want. Anything the model returns is a take to review, not a finished transition.
Morphing questions worth answering
Is morphing the same as tweening?
No. Tweening interpolates between two poses of one subject, so the subject's identity is fixed and the work is timing. Morphing changes the subject itself, so the work is deciding which part of A becomes which part of B. A morph can be tweened afterwards, but the anchor decision comes first.
How long should a morph be?
Long enough for the eye to follow one path, short enough that no two objects are visible at once. In practice: 12–17 frames at 24 fps when the change happens inside a shot, 24–36 frames when the change is the shot. Hold both ends for at least six frames so the start and end states are registered.
Why does my AI morph turn into a blur?
Usually the blend is doing the work the warp should have done. When a model cannot find a correspondence, it averages the two textures and the result reads as a soft cross-fade. Shorten the change, name the parts that correspond, and let the surface change happen last.
Can I morph two photos of different people?
You can, and it is the classic case, but it is also the strictest: faces need more anchor pairs than objects — eyes, nose base, mouth corners, jaw, hairline — and the offset tolerance is tighter because viewers are expert at faces. Two photos taken from very different angles will force the model to invent a three-quarter view, which is where identity drifts.
Can I morph text or a logo?
Not reliably. Lettering has no stable geometry to warp, so generated morphs tend to invent plausible characters. Keep type and marks out of the morph entirely, then add the real asset in an editor, and check the mark's proportions against the original file rather than against the model's version.
Morphing is a small, countable craft hiding inside a big visual effect. Fix the endpoints, name four or five anchors, choose one route, and count the frames at both ends — then start from a frame in Ottermind and let the model do the part it is actually good at.